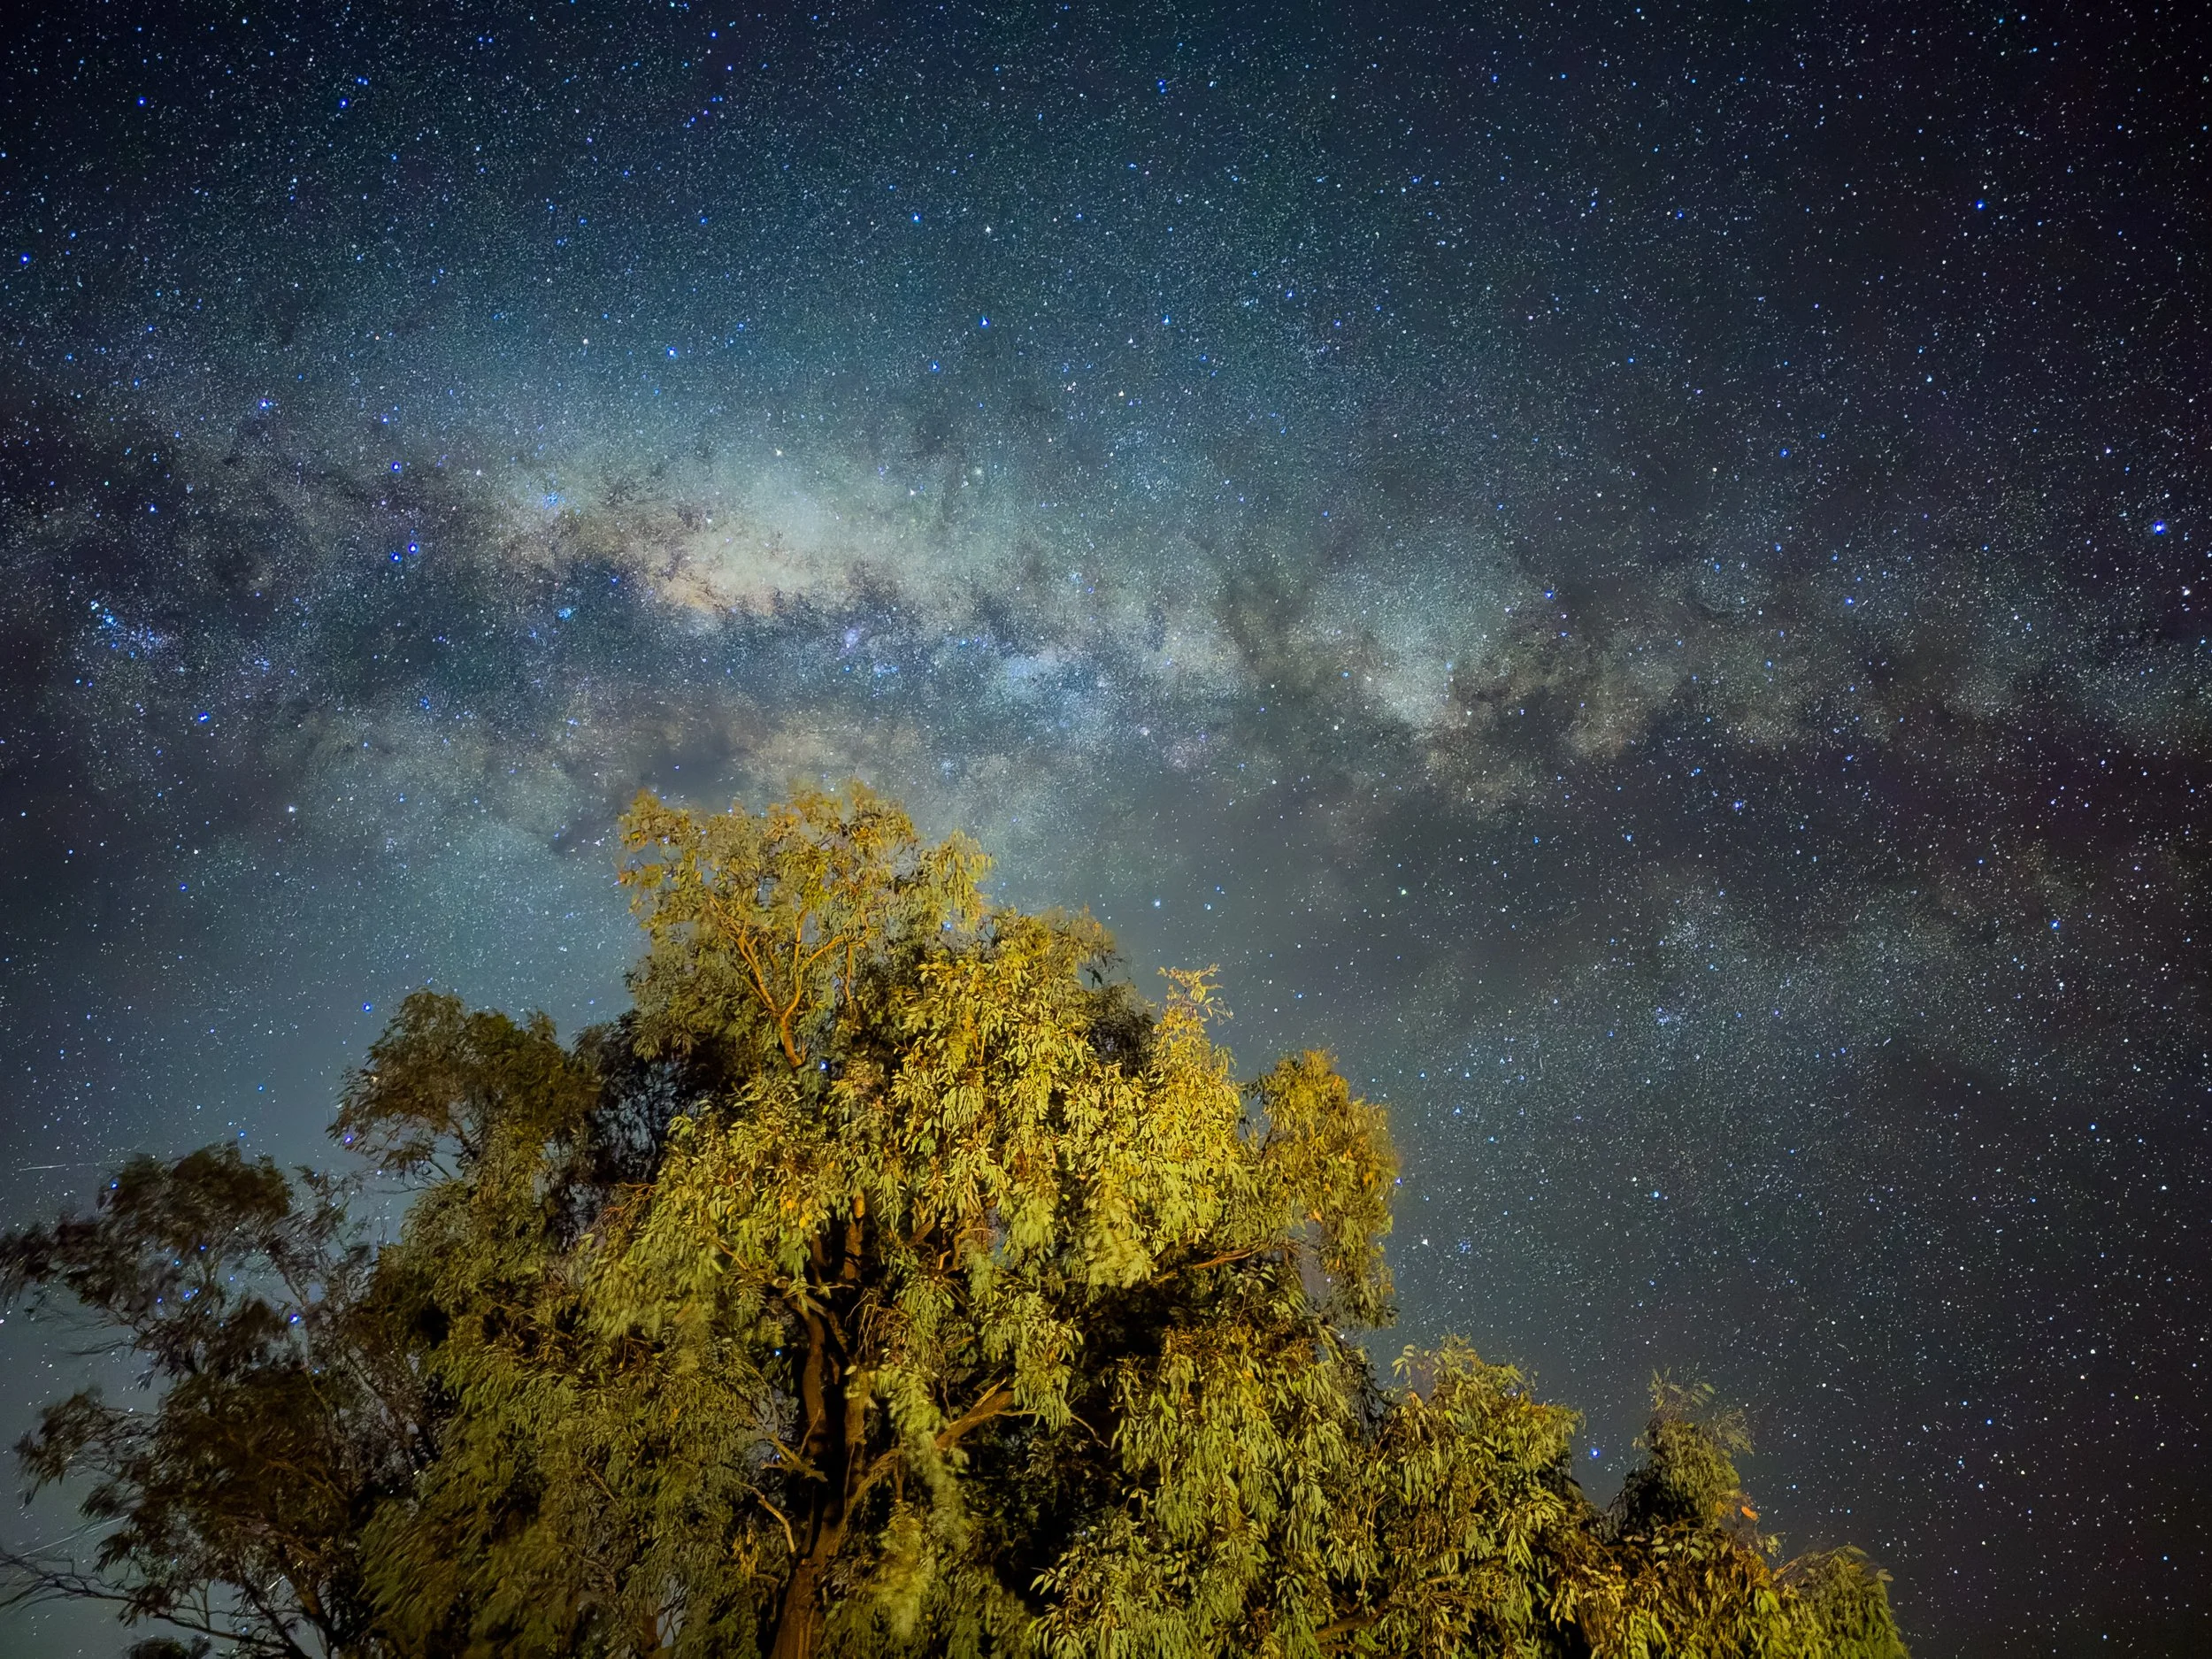
I've been photographing the Milky Way with iPhones since the iPhone 11 Pro. Back then, the idea of taking a decent photograph of the stars with a phone seemed a bit ridiculous.
But it worked. And over the following years, I watched iPhone astrophotography get progressively better.
The iPhone 12 Pro Max impressed me. The 13 Pro Max took another step forward. The 14 Pro Max gave me a few headaches, and by the time the iPhone 15 Pro Max arrived, I genuinely thought we'd reached something pretty special.
In fact, until now, I've considered the iPhone 15 Pro Max the best iPhone for astrophotography.
Then along comes the iPhone 18 Pro Max.
And for the first time in a while, there's a camera feature that genuinely made me curious enough to put my hand in my pocket and buy another iPhone.
Variable aperture.
But does changing the aperture actually make a difference when photographing the Milky Way?
I headed out under the stars to find out.
What's Different About the iPhone 18 Pro Max Camera?
For years, iPhone cameras have used fixed apertures. You couldn't change how wide the lens opened because that was determined by the hardware.
The iPhone 18 Pro Max changes that.
Its main camera offers four aperture settings:
f/1.48
f/1.8
f/2.8
f/4
For anyone unfamiliar with aperture, here's the simple explanation.
Aperture controls how much light passes through the lens and reaches the camera sensor.
A lower f-number means a wider opening, allowing more light into the camera. A higher f-number means a smaller opening, allowing less light through.
On a traditional camera, you'd see the aperture blades opening and closing inside the lens. Think of those old James Bond opening sequences.
Now, in normal photography, having control over aperture can be useful for several reasons.
But astrophotography is a different beast altogether.
We're trying to photograph something that's incredibly faint, using a sensor that's tiny compared with what you'd find in a mirrorless camera.
And my initial thought was that perhaps going as wide as f/1.48 wouldn't necessarily produce the best-looking astrophotograph.
I've often used apertures around f/2.4 and above when photographing the night sky with larger cameras.
Of course, smartphone photography involves a lot more computational processing, so I wasn't entirely sure what to expect.
Which is why I wanted to test it.
Planning a Milky Way Photograph With PhotoPills
Whenever I'm heading out to photograph the Milky Way, one of the first things I do is open an app called PhotoPills.
It's a brilliant tool for working out where the Milky Way will be, how the galactic core will line up with your subject, and when you should be there to photograph it.
For this particular test, I had a rocky outcrop in mind.
I've photographed this location with previous iPhones, so I already had some images I could use for comparison.
The plan was to position the rock in the foreground with the Milky Way behind it, then photograph exactly the same composition using all four aperture settings.
Simple enough.
Except, as anyone who's done astrophotography knows, the best-laid plans don't always survive contact with the weather.
Cloud was forecast to move in, and the galactic core was sitting higher in the sky than I'd hoped.
The composition I originally wanted wasn't going to happen.
So I changed plans.
Instead of the rocky outcrop, I found a tree that would give me something useful in the foreground while still allowing me to photograph the galactic core.
And that actually worked quite well for what I wanted to test.
How I Set Up the iPhone 18 Pro Max for Astrophotography
One of the best things about iPhone astrophotography is that you don't need a ridiculous amount of equipment.
For this test, I used:
iPhone 18 Pro Max
A tripod
A MagSafe phone holder
A small light for illuminating the foreground
The built-in iPhone Camera app
That's pretty much it.
I mounted the iPhone on the tripod, composed the photograph and selected Night mode.
The important thing here is getting Night mode to offer its maximum 30-second capture.
When you put the phone on a stable tripod, it can detect that it's not being handheld and allow a longer Night mode exposure.
Sometimes it doesn't show 30 seconds immediately. Just give it a moment.
I also enabled ProRAW because I wanted the flexibility to recover detail and edit the photographs afterwards in Adobe Lightroom.
For the foreground, I positioned a small light near the tree and reduced its output considerably.
You don't need much light for this sort of photograph. In fact, too much light will make the foreground look completely unnatural.
I was trying to capture some detail in the tree without overpowering the night sky.
What About Focusing on the Tree and the Stars?
This is one of the fascinating things about modern smartphone astrophotography.
The tree was only around eight or nine metres away.
The stars, obviously, were a little further.
On a traditional camera, getting both the nearby foreground and distant stars looking sharp can require some careful planning.
But the iPhone uses computational photography to combine information from multiple exposures.
During a 30-second Night mode capture, the phone can collect and process multiple frames to create the finished photograph.
And the remarkable thing is that you don't really need to worry about most of that.
The camera handles it for you.
That's part of what makes smartphone astrophotography so accessible.
Testing All Four Aperture Settings
With everything set up, I photographed the same scene at each aperture setting.
I started with f/1.48, then moved through f/1.8, f/2.8 and finally f/4.
I kept the phone on the tripod and used the maximum 30-second Night mode setting for each photograph.
I expected there would be some differences.
What I didn't expect was just how noticeable they would be.
f/1.48: Plenty of Light and Detail
The first photograph was taken at f/1.48.
Straight away, I was impressed.
The galactic core was clearly visible, there was plenty of detail in the sky, and the stars looked reasonably sharp.
The foreground tree was also fairly well focused, although there was some movement in the leaves during the exposure.
Looking at the metadata afterwards, this image was recorded at ISO 3200.
But there was something else I noticed when zooming into the photograph.
Those familiar iPhone astrophotography artefacts.
If you've spent much time examining iPhone star photographs at 100%, you'll know exactly what I'm talking about.
Some of the stars develop these strange little worm-like patterns. They're not particularly attractive, and they're one of the telltale signs of the processing happening behind the scenes.
At normal viewing sizes, the photograph looked pretty bloody good.
But I wanted to see what happened at the next aperture.
f/1.8: The Surprise
The second photograph was taken at f/1.8.
And this is where things got interesting.
Looking at the image on the phone, I thought the sky might actually have a little more definition.
The metadata showed ISO 5000, higher than the previous photograph, which makes sense given the smaller aperture opening.
There was still plenty of detail in the Milky Way, and the stars were clearly visible.
But what caught my attention was the overall appearance of the photograph.
It looked a little more natural to me.
Not necessarily brighter or more detailed in every area, but more natural.
I wasn't expecting that.
f/2.8: Losing Too Much Detail
Next was f/2.8.
Before heading out, I had wondered whether this might be the sweet spot.
It wasn't.
The photograph was noticeably darker, and we started losing considerable detail in the night sky.
There were fewer visible stars, and the galactic core didn't have the same definition as the previous two photographs.
It was a bigger difference than I expected.
f/4: Not for This Sort of Photography
Finally, f/4.
And there's really no point dressing this up.
For this particular astrophotography test, f/4 simply wasn't competitive.
The image was considerably darker, with much less detail visible in the sky.
It reminded me more of the sort of results we were getting from much older iPhones.
That's not to say f/4 doesn't have a purpose.
I think it could be interesting for other types of photography, particularly things like light trails, where controlling the amount of light entering the camera could be useful.
But for photographing the Milky Way?
I wouldn't use it.
Comparing the Photographs in Adobe Lightroom
The following day, I imported the photographs into Adobe Lightroom Classic on my computer.
You can do the editing I'm about to describe on your phone as well, but I prefer working on a larger screen when I'm examining the detail in astrophotographs.
The peepers aren't what they used to be.
I looked closely at the metadata, the detail in the galactic core, the stars and the foreground.
The differences were pretty obvious.
At f/1.48, there was plenty of detail, but some of the processing artefacts in the galactic core were quite noticeable.
At f/1.8, I felt the image had a slightly more natural appearance.
The f/2.8 image had already lost too much information for my liking.
And f/4 wasn't worth spending time editing for this particular scene.
That left two photographs worth working on.
f/1.48 and f/1.8.
How I Edited the Milky Way Photographs
I kept the editing relatively simple because I wanted to compare the images rather than completely transform them.
In Lightroom, I selected the masking tool and created a mask for the sky.
From there, I concentrated mainly on two adjustments.
Dehaze
This is one of my favourite adjustments for Milky Way photography.
I increased Dehaze to somewhere around 30 to 40, depending on the photograph.
This helps bring out definition in the galactic core and adds contrast to the night sky.
Clarity
I also adjusted Clarity to help bring out some of the structure in the Milky Way.
You need to be careful here.
It's very easy to push astrophotographs too far, especially when the phone has already applied considerable computational processing.
The goal isn't to make the Milky Way look like something out of a science-fiction film.
I want the photograph to look good while still retaining a reasonably natural appearance.
And once I'd edited both images, I had a clear preference.
So, What's the Best Aperture for iPhone 18 Pro Max Astrophotography?
Based on this test, f/1.8 is my preferred setting for photographing the Milky Way with the iPhone 18 Pro Max.
That's not because f/1.48 is bad.
Far from it.
At f/1.48, the camera captured plenty of light and produced a photograph with a lot of detail.
But when I compared the edited photographs, I felt the f/1.8 image looked slightly more natural, particularly around the galactic core.
The processing artefacts in the f/1.48 photograph were a little more noticeable to my eye.
And that's an interesting result.
Because one of the biggest selling points of this new camera is the wider aperture.
Yet for this particular type of photography, opening the lens as wide as possible didn't automatically produce my favourite photograph.
There's a difference between capturing more light and producing the image you prefer.
Of course, this is one night, one location and one particular composition.
I'll be doing more testing as the Milky Way moves into different positions in the sky, including some more interesting foreground compositions and potentially some panoramas.
But for now, f/1.8 is where I'd start.
Is the iPhone 18 Pro Max Better Than the iPhone 15 Pro Max for Astrophotography?
This is probably the question I've been most interested in answering.
For quite some time, I've considered the iPhone 15 Pro Max the best iPhone I've used for astrophotography.
I've been disappointed with some of the results from the generations that followed it.
But having spent some time photographing the stars with the iPhone 18 Pro Max, I think that might finally be changing.
The photographs from this test are very encouraging.
I'm seeing results that make me want to get back out there and experiment.
And that's something I haven't felt about a new iPhone camera for a while.
I'm not going to claim this one test proves the iPhone 18 Pro Max is better in every astrophotography situation.
There's more work to do.
But I certainly think it has the potential to take the top spot.
Do You Really Need an iPhone 18 Pro Max to Photograph the Milky Way?
Absolutely not.
And this is something I've been saying since I started teaching phone astrophotography.
If you've got a capable smartphone, a tripod and access to a reasonably dark sky, you can get out there and start photographing the stars.
You don't need to spend thousands of dollars on equipment to have a crack at astrophotography.
Is a dedicated mirrorless camera with a fast lens going to produce better results?
Absolutely.
Astrophotography is one of the few areas of photography where I genuinely believe equipment can place some fairly significant limits on what you can achieve.
A larger sensor, a fast lens and more control over your exposure will open up possibilities that smartphones simply can't match.
And once you get into deep-sky photography, you're entering another world of equipment altogether.
But that's not the point of phone astrophotography.
The point is that you can take the phone you've already got, head outside on a clear night and capture something pretty extraordinary.
And that's still one of the things I love most about it.
Download the iPhone 18 Pro Max Astrophotography Examples
've made the photographs from this test available so you can examine the results for yourself.
Rather than relying on what the images look like in a compressed YouTube video, you can have a proper look at the detail, the stars and the differences between the aperture settings.
[Download the iPhone 18 Pro Max astrophotography sample images here]
I'd be particularly interested to hear which photograph you prefer.
Do you like the additional detail in the f/1.48 image, or do you agree that f/1.8 looks a little more natural?
Photography is subjective, and there's no reason we all need to prefer the same result.
For me, the most encouraging thing about this test is that the iPhone 18 Pro Max has made smartphone astrophotography interesting again.
And after a couple of disappointing generations, that's a pretty good place to start.